
Building ARM Templates
Posted 07 Aug 2021
I've been doing a fair bit of ARM template development over the past 2 years and even though Bicep is quickly overtaking ARM for new development, there is still a fair bit of Infrastructure as Code being developed with ARM. This post summarizes what I tell devs to get them up to speed. It mostly lists out the tools and techniques I'm using to write and verify the template before pushing them in a PR. Along the way I'll point out some of the gotcha's to hopefully help you save some time.
A primer on ARM templates
ARM templates are essentially a way to declare calls to be made to the Azure Resource Manager REST API. There are a couple of advanced features in there (like iterating over a set) but this is the essence; you're declaring API calls. ARM is not a programming language.
Development environment
There is really only one editor that does the job well: VS Code with the Azure Resource Manager (ARM) Tools
These do a brilliant job on syntax highlighting, code completion and validation. Files load up fast and searching and navigation is easy. It even offers some refactorings nowadays, for example to rename a parameter.
Pro Tip: the snippets provided by the Azure Resource Manager (ARM) Tools plugin are huge productivity booster once you get more familiar with the ARM syntax.
I stay away from Visual Studio when authoring ARM templates. Even trivial templates tend to trip up the editor.
Use the reference docs
Starting an ARM template from scratch can be hard, even with the handy snippets. Many times, you'll want to base your template off of an export from the Azure Portal. However, the exports are often incomplete or missing newer features. If you know the resource type though, you can lookup the details for each API version in the ARM template reference docs.
A quick search in any search engine will usually get you there as wel.
For example:arm reference apim
If you know the name of the resource type you're creating, drop that in the search box for even faster results.
Use the Azure Quickstarts repo
For more complex tasks, the Azure quickstarts are a good source for inspiration. You can also go straight to the GitHub repo. There are templates in this repo covering the most common deployment scenarios for just about any resource.
If you login to GitHub you can search the repo for a specific resource type of keyword to help you figure out how to use them.
ARM templates are Code
Coders us some really basic guidelines like DRY to keep the code clean. ARM templates are code, so apply the same principals for writing clean templates. Most importantly, try to give everything a proper name and Don't Repeat Yourself. The variables section is a great place to encode your conventions so that you don't have to apply the same string manipulations over and over.
Use comments
Pretty much all of the tooling now support comments. Use them wisely to help clarify anything that may be counter intuitive or to help clarify magic numbers like IP ranges.
Don't skimp on parameter definition
When you define a parameter, try to be as specific as possible. Don't just define the type, define the allowed values, a sensible default and add a description.
"parameters": {
  // ....
  "apimAddApi": {
      "type": "bool",
      "defaultValue": false,
      "metadata": {
        "description": "Control whether to add the web app to API Management as an API. For function apps that have no HTTP endpoint, this defaults to false."
      }
  }
// ....
}
Variables are your friends
Variables are a good way to apply conventions to your infrastructure. If you find yourself combining values to come up with parameter values for individual resources, you're probably better off moving that into the variables.
Note that variables don't have to be flat values. They can be objects and arrays, enabling rich nested values. The VS Code plugin will give you auto-completion for these variables.
Pro-tip: merging arrays and objects to provide defaults
If you're used to Javscript development, this will look familiar. Say you want to provide webapps with some default settings and don't want to repeat that for every app you deploy. You can do that by defining an object with the default settings in the variables and applying the union function so additional settings and overrides can be provided via the template parameters.
"variables": {
// ...
"defaultSiteConfig": {
   "metadata": [
      {
         "name": "CURRENT_STACK",
         "value": "dotnetcore"
      }
   ],
   "alwaysOn": true,
   "http20Enabled": true,
   "minTlsVersion": "1.2",
   "ftpsState": "Disabled"
}
// ...
}
On the website resource, use the union function to apply the defaults with any overrides passed in through the parameters:
"resources": [
    {
        "name": "[variables('deployments').app.name]",
        "type": "Microsoft.Web/sites",
        "apiVersion": "2020-12-01",
        "kind": "app,linux",
        "properties": {
            "siteConfig": "[union(variables('defaultSiteConfig'), parameters('siteConfig'))]"
        }
    }
]Note that the second argument in the union takes precedence. So you'll want the defaults on the left and the overrides on the right.
Pro-tip: format rather than concat
You'll usually need to combine parameters into longer strings, for example to come up with convention bases resource names. I tend to favor the format function over the concat function because it is so much more readable.
Pro-tip: resourceId function
Resources are seldom deployed alone, so we need to build references to other resources; resource ids. You can use the format string to do so but there is a more specialized function that will give better feedback on whether the parameters actually constitute a valid resource id. So, if at all possible, use the resource id function to build resource ids.
Validate the template
Deploying ARM templates can take quite a bit of time, nothing is more annoying than waiting for minutes, only to find a typo and having to do it again. So validation is a time saver and can be done at multiple levels:
Validation in the editor
VS Code does a good enough job of basic syntax validation. It will highlight missing variables and parameters as well as unused ones.
Beware that later versions of ARM deployment tooling can be more permissive than older versions. For example, in the past comments inside JSON files were not allowed and indeed older Azure Powershell versions still cannot deal with this. Older versions of Azure DevOps ARM tasks also have trouble with this.
If you run into syntax issues on deployment, make sure you have the latest version of both the tooling and the ARM schema.
Validation by the Azure Resource Manager
The ARM tooling supports doing a dry run for your templates. This will give basic error checking and is mostly useful to validate if all the required parameters are set and linked templates are available. A dry run will however not validate against the actual resources so the real test is in the actual deployment of the templates to Azure.
Your deployment failed... now what?
The ARM tasks in your deployment pipeline probably won't tell you what when wrong. You'll need to go to the Azure Portal and look at the deployments tab for the resource group you're deploying to.
Pro tip you can deploy to multiple resource groups from a single ARM template. So, make sure you check all the target resource groups for failures.
Click through to dig deeper and get at whatever failure occurred. The nice thing is that the detail screen will allow you to inspect the ARM template and its parameters.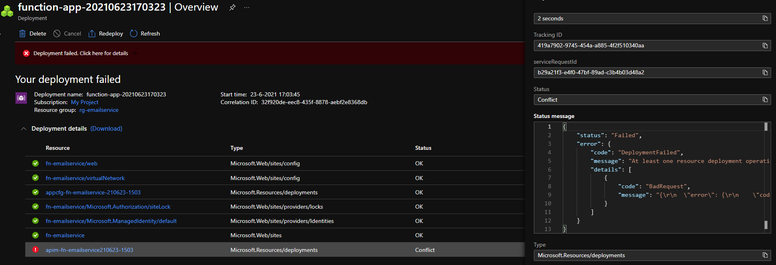

Enable deployment from the developer laptop
Being able to deploy from a pipeline is essential but the feedback loop is a bit long if you're doing more than trivial changes. Being able to test ARM templates from the dev machine is an essential way to speed up the development cycle. It's a bit of a fine art but totally doable.
First make sure you have sufficient privileges to deploy from your development environment. Usually, the contributor role is required. Then login to Azure from the command line. I usually work with a PowerShell script (see next section) so I login with PowerShell but Azure CLI works quite well too.
For more information on deploying ARM templates from PowerShell or Azure CLI, please check the linked documentation.
Deploying linked templates
The Azure Quickstart Templates repo contains a comprehensive PowerShell script and a shell script to deploy linked templates.
If you're working on a large project with multiple subscriptions, you'll probably want to add some safeguards to the script to ensure you're deploying to the right subscription and resource group.
Solving dependency issues
Once you get into deploying templates you'll probably notice that there are ways to paint yourself into a corner, requiring you to execute a template multiple times for it to succeed.
For example, suppose you want to roll out an API Management instance. The instance will need a certificate from Azure KeyVault. To get to the secret from KeyVault you need to grant permissions to the APIM. To be able to do that you give the APIM a managed identity. But... a system managed identity is created when the APIM is deployed. However, the APIM cannot be deployed without access to the certificate.
In this case the solution is to switch to a user assigned identity, which can be created first.
Gotchas
- Pick the right API version, both for resources and the template itself. Most of the time you'll want the latest version.
- Beware of stray comma's, they make templates invalid in the most unexpected ways